


How to: work Judy’s Magic cast on
video by
Let's Knit Together
- Overview
- Practical Guides
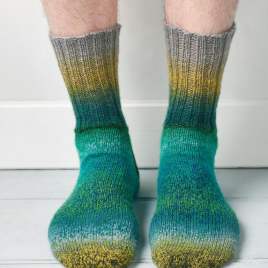
This cast on is worked with three double-pointed needles and is perfect for items knitted in the round from a narrow starting point, such as toe-up socks or top-down hats. It magically creates a seamless double-sided piece from just a few stitches.
The method was invented by Judy Becker, who could not find a cast-on method for toe-up socks that she liked, and it can be used for patterns with an even number of stitches. Hold two double-pointed needles parallel in your right hand, so you have a top needle and a bottom needle. Sandwich the strand of yarn between the needles with the tail end at the front and the working yarn (attached to the ball) at the back, draped over the top needle. The yarn tail needs only to be long enough to create half of the number of stitches, plus a length for weaving in. Hold both strands in your lower fingers and move the working yarn over your thumb and to the front so this creates a twist under the needle; at the same time insert your index finger under the yarn tail. This creates a C shape with your hand, with the strands going from the needles around the outer parts of your finger and thumb, while being tensioned with your lower fingers. TIP If you find starting tricky, place a slip knot on the top needle, then hold the yarn strands as stated. Set up a tension on the strands that is not too floppy or tight, which can take a little practice; if you have to restart a few times, at least it is just a few stitches. To cast the stitches onto the needles, each strand is looped around its opposite needle, working from the front to back (that is bottom to top). As there is already one stitch on the top needle (created by the initial draped and twisted strand), the next step is to cast a stitch onto the bottom needle, then add stitches to alternate needles until the correct number of stitches has been cast on. Work as follows: Wrap the yarn tail over the bottom needle from front to back (bottom to top). Bring the working yarn between the needles and wrap it around the top needle from front to back (bottom to top). Continue casting on stitches with this looping action to reach the correct number. This will become the right side on the top edge or tip of your item. If viewed from the underside, the purl ‘bumps’ are visible. TIP Some people find it easier to move the needles, others their fingers – it doesn’t matter as long as the needles stay in the upper and lower positions. When the correct number of stitches has been cast on, turn the needles 180 degrees while keeping the right side facing so the bottom needle is now on top; transfer the needles to your left hand, still holding them parallel. Bring the working yarn in front of the yarn tail to help secure the first stitch. Insert a third double-pointed needle knitwise into the first stitch on the top needle and knit this stitch, pulling the yarn tail tight to secure the stitch, then it is possible to drop the tail. Keeping the right side facing you at all times, work in the round over these two needles following your pattern, adding markers or increasing as directed. You may find it easier to work this first round over the top of the bottom needle, as it can seem a little awkward, but once you have worked a round or two you’ll be into your usual knitting stride. Follow your pattern as usual, changing or spreading your stitches across more DPNs as directed. To work this cast on method on circular needles, pull your needle out from the bottom stitches and knit with that, then pull the other needle in the same way to work in the round. If you find you are more comfortable looping the cast on stitches in another way or have worked in different ways for the same cast on, you can turn the stitches to the correct orientation as you knit them the first time. For the knit side of stocking stitch, the front (leading) leg of the stitch should be slightly in front of the back leg. If your knit stitch has the back leg more ahead of the front one, knit through the back of the stitch to turn it the right way when it comes off the needle. The benefit of working a sock from the tip is that you’re unlikely to run out of yarn before you get a wearable sock.


 Kntting Video")


 Kntting Video")
