


How To Knit a Mitred Square
video by
Neti Love & Julie Peasgood
- Overview
- Practical Guides
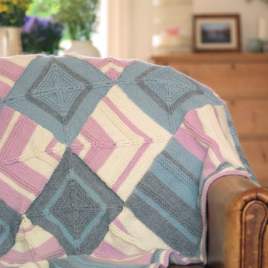
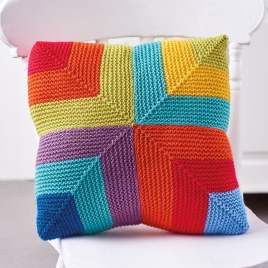
A classic mitred square is worked in garter stitch and is easily identified by the neat edges and diagonal corner to corner ‘vein’ that makes it look like a diamond or joined triangles. This type of square is formed by decreasing either side of the centre on alternate rows, and is popularly used in modular knitting, to create stunning geometric effects.
The fun thing with mitred squares is that you can create all sorts of patterns with them, depending on how you orientate them, either all in the same direction, facing towards or away from each other. Add stripes or self-striping yarns into the mix, and you can get very exciting designs. Here we look at using ssk (slip, slip, knit) and k2tog (knit to together) to create the double decrease.
You’ll begin this version with an even number of stitches, and the cast-on edge forms two sides of the square after decreasing on the first row. It’s a simple two-row pattern repeat and results in a neat shape all by itself. It may be easier to think of it as knitting a diamond shape, with, and halfway along the first row, you will begin your first decrease that creates one of the corners.
Cast on 28 stitches, as in the video, for a square that will have 14 stitches to each side. Place a stitch marker between the central two stitches. On the first row, knit to two stitches before the marker, then work ssk (slip, slip, knit) for a left-leaning decrease. Slip the marker, then knit the next two stitches together for a right-leaning decrease, which is key to the symmetry of the square. Next, knit to the end of the row. Even after this first row, your ‘corner’ point will have formed in the middle of the row, and the first and last stitches will become other corners. Knit back across the row. Repeat this two-row pattern repeat until you are able to fasten off through the last two stitches to make the last corner.
The two sides look quite similar, and you may prefer one to the other, so bear this in mind if you are making up a project. If you find it hard to tell the sides apart, add a stitch marker or thread to your right side within the first few rows.
Sample pattern
Cast on 28 sts using cable cast-on method, pm between centre sts
Row 1: k to two sts before marker, ssk, sm, k2tog, k to end
Row 2: k to end
Rep last two rows until two sts rem
Fasten off
If you decide to make up your own mitred square design, plan it out first so you know how many squares to make, in which colours and in which order to piece them together. Picking up stitches along an edge and then casting on the remainder allows you to join these squares without having to sew them together. Alternatively, leaving long tails can be used to join pieces together if the yarn benefits from blocking first.


 Kntting Video")


 Kntting Video")
