


How to: work moss stitch
video by
Let's Knit Together
- Overview
- Practical Guides
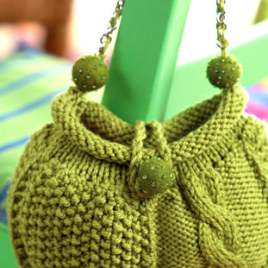
Moss stitch is usually worked over two or more off-set rows. It has a lovely raised texture created from alternating knit and purl stitches on the same row, which takes a little concentration to start with.
Be sure to move the yarn between the tips of your needles after each stitch to avoid getting out of sync or any accidental yarn overs.
The deep waffle effect is the result of purl ‘bump’ next to flat knit stitch all along the row and then offset on the next row, making this ‘knit one, purl one’ pattern very easy to remember. It is essential, though, to move your yarn to the correct position between your needles after every stitch so it is ready for the next one. You’ll also notice that if you work a sample of moss stitch the edge lies flat, making it a popular choice for cuffs and borders, and it looks the same from both sides, so make sure you know which is your right side for making up. Using a fluffier yarn is going to result in a softer overall look than a smooth one, which can look very crisp, but whatever the pattern it’s sure to look amazing. Have a practice with your own sample using this easy repeat: [mini header] Moss stitch sample Cast on seven stitches Row 1: (k1, p1) to last stitch, k1. Seven stitches Rows 2-6: rep Row 1 Cast off In the above example each row is the same, as the last knit stitch of the row forms a purl stitch on the reverse for the next row. If you cast on an even number of stitches, the first row would repeat knit one, purl one to the end, but in order to create the offset the second row would repeat purl one, knit one to the end. With an even number of stitches, the pattern is a two-row repeat. If you get out of step with alternating the stitches, you can end up with odd sections of stitches where you may have a couple of purl or knit stitches together that will be really noticeable in such a small and regular pattern, and this could even look like an accidental bit of rib stitch. The other pitfall is that you find you have extra loops on your needle that due to accidental yarn overs, which will throw out your stitch count. [Can we put a tint behind or box around this next section?:] If you get lost and aren’t sure what your next stitch should be, here are two ways to work it out: What does the stitch look like? If it has a bump right under the needle, this is a purl stitch, so work a knit stitch into it. If it has a V hanging from the needle, this is a knit stitch, so work a purl stitch into it. What is the slope of the loop on the needle? If the slope is ‘away’ from the right-hand needle, purl it. If the angle is straight down or slightly towards the right-hand needle, knit it.


 Kntting Video")


 Kntting Video")
