


How To Work Crossed Stitches
video by
Neti Love & Julie Peasgood
- Overview
- Practical Guides
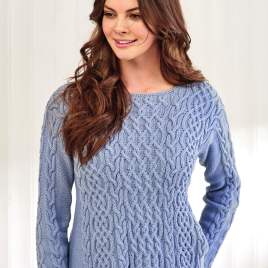
This versatile technique, also sometimes called travelling cables, is worked with a cable needle and moves a column of stitches to the left or right across the background over a number of rows. They can be used in conjunction with several cables to create complex braids or on their own for a honeycomb-style effect.
Depending on the pattern, the ‘cable’ can be one stitch for a fine trellis effect or several stitches for a bolder texture. The background may be purl or knit. A cable needle is used to swap the order of stitches so that they cross over stitches on the background.
Patterns usually have a special abbreviation for cross stitches, for example, Cr3R to move to the right or Cr3L for a move to the left, with the number in the abbreviation relating to the number of stitches involved. Always check the pattern’s special abbreviations for how to carry out the specific stitch.
Crosses, cables, and twists can also be expressed at a chart as a slash across more than one square and will be clearly labelled in the key.
As with any type of cable, the column of stitches is set up with a foundation row, to establish the knit stitch cable on the background. In the sample, there are two knit stitches in the cable, and these stitches are worked on the right side. Carry on with the pattern before and after each crossed stitch manouvre.
Left Cross (Cr3L)
To work a left cross, work up to the cable of two knit stitches, then slip the next two stitches purlwise onto the cable needle. Allow the cable needle to sit at the front of the work, then purl the next stitch from the left-hand needle. Next knit the stitches from the cable needle, and this will move the two cable stitches by one stitch to the left.
You can remember the left cross as the cable needle being ‘left at the front’.
Right Cross (Cr3R)
To work a right cross, work up to the stitch before the cable of two knit stitches, then slip the next stitch from the left-hand needle purlwise onto the cable needle. Allow the cable needle to sit at the back of the work. Knit the next two stitches – the cable – from the left-hand needle. Next, purl the stitch from the cable needle. This will move the two cable stitches by one stitch to the right.
You can remember the right cross as the cable needle being ‘right at the back’.
TIP: When ready to work the stitches from the cable needle, hold it with the left needle so that the parallel angle feels more comfortable.
Travelling cables can either look very complex in combination with other cables with twists and different widths or quite striking with more space around them so it really stands out, especially if it is in a different shade of yarn. The more number of stitches purled, the sharper the angle of travel.


 Kntting Video")


 Kntting Video")
