

Guest blogger and knitwear designer Jenise Reid is passionate about knitting flattering garments to suit your body type. In the first of two blogs for Let’s Knit, she gives advice on how to knit for some of the most common shapes.
Fit is essential. I would much rather see my sweaters on the figure they are intended to fit, and I actually think my sweaters look better on a body with curves. I don’t know why straight figures are considered beautiful – I prefer well-proportioned curves, whatever your weight.
Got something you don’t love about your body? Don’t put the interesting part of a garment there to draw attention to it! And remember, when you try to make one area of the body smaller, it is often at the expense of making another area larger. It works, but you should consciously make choices about what should be growing and what should be shrinking – give your whole body a look over when you try on a garment, not just the one thing you care about the most.
Here are some of the four most common body types. Don’t take them as gospel – it’s mostly about helping you to understand your body’s proportions.
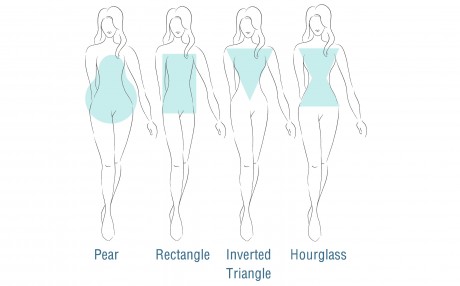
Pear
For those heavier on the bottom, try making a sweater in a neutral color, but with a colorful fair isle yoke. A sweater with a stockinette body and lace yoke is also a great idea. Any fun detail at the top is perfect. Wide sleeves, puff sleeves, high and wide collars are all good choices. It is usually simple to add in extra inches to the bottom of a sweater. Don’t hesitate to do so! Basically, anything to add volume or detail to the upper half of the body is a good choice. If you saw the photo of the sweater, and didn’t notice what the bottom was like, that was a good choice for you.
Rectangle
No waist? Depending on the person, a belt (or waist shaping) might create a waist. But often it will simply draw the eye to it, without making it look smaller. A safer choice is to alter a fitted sweater pattern – leave out any waist shaping in the front or possibly the sides, but keep it on the back. If you can get the sweater to hang straight off the bust down to the hip, it can create an illusion that there is a smaller waist under there than there really is. A long (low hip length) open cardigan that flares at the bottom can create the illusion of more shape, particularly if you wear a belt at your waist under the cardi. If you have shapely hips, a loose sweater with a band only an inch or two past your waist can be a good choice as well.
I think this is often the hardest figure to dress; experiment and try on lots of clothing to figure out what works for you, then take out your tape measure and copy the cut when you knit.
Inverted Triangle
If you are top heavy, you need to learn to knit short rows, and short row bust shaping. You can add it to any basic sweater pattern you like, and the difference in how the sweater looks is amazing. Pick necklines that don’t cover your collarbone. Peplums are perfect for you, just be sure to do your short rows so the waistline is straight. Open cardigans may or may not work for you, it’s best to try it and see. If you want to wear a cardigan buttoned up, be very careful to have a button exactly at the fullest point of the bust. This is the only way to prevent gaping over the bust, and it works surprisingly well. With a full bust, you will almost always need to alter the pattern if you want the sweater to fit well, but in return you will end up with sweaters that look better on than anything you can buy. It is worth the trouble.
Hourglass figure
Basically everything will look good! If your curves are unusually pronounced, you may need to add bust short rows and some additional shaping at the hips. But you don’t need to be afraid of any cut or shape – try them all!
To see more of her designs and try them out for yourself, check out her Ravelry page.


_333_180_c1.png)
 Baby
Baby
 Toys
Toys
 Garments
 Crochet
 Homewares
 Dolls
Dolls
Share