


How to save valuable time for knitting gifts for your loved ones this Christmas
As knitters, we find inspiration for future projects throughout the year and many will have a ‘Knits for Christmas’ list that began as early as Christmas Day last year. After all, it’s never too soon to start planning for the festive season! Now, we all know, that no matter how early we start we will still be sitting down on Christmas Eve frantically finishing up at least one gift for a loved one who’s arriving first thing on Christmas morning. So hopefully these tips and time-saving products will mean that all your knitted treats are wrapped up and under the tree with time to spare!
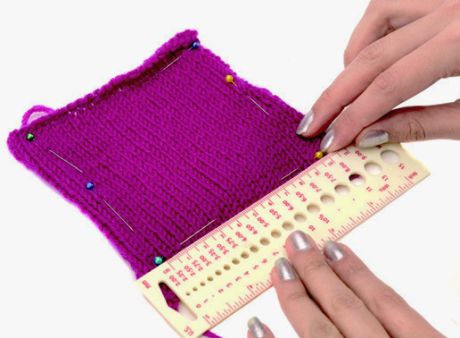
How to knit a tension square
Knitting to the correct tension is the best way to make sure your work will come out the correct size. This is particularly important with gifts as you want your project to fit the recipient. Working a tension square before you start will save you time in the long run! Your pattern will tell you how many stitches and rows you should get over a 10cm square. Using the needle size instructed, cast on the number of stitches given plus five more. This is because you need a border around your 10cm area. Following the stated stitch pattern, work the required number of rows, plus five more, then cast off. You should always treat your tension square as you would your finished piece, so block it to even out the stitches. When your swatch is dry, use pins to mark out a 10cm square area in the centre. Make sure you start with a whole stitch – this is a complete v-shape. You should end up with the same number of stitches as given in the pattern but if you don’t, you will need to change the size of your needles. If you have too many stitches, go up a needle size; if there are too few, go down a needle size. Really tight or loose knitters may have to adjust by more than one needle size to get the right measurements.
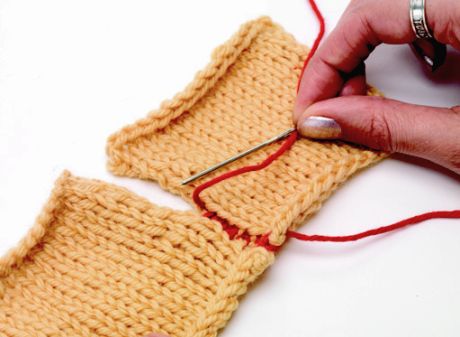
How to work mattress Stitch
Finishing your work well is just as important as the knitting, and mattress stitch is a quick and easy seam that creates an almost invisible join. It’s also known
as ladder stitch. To join the yarn, position the two panels side-by-side with the right side facing. Bring your tapestry needle through the front of the first stitch on
one side, then insert through the back of the corresponding stitch on the other panel. Bring the needle through the back of the original stitch on the first side and finally take it through the front of the second side so you have a figure-of-eight. Pull tight to secure.
To work mattress stitch, insert the needle under the horizontal bar between the edge stitch and the second stitch. Do the same on the other side and continue to work up the edge, hooking the horizontal bar each time. Pull this tight to close the seam.
Carrying yarn up the side of your work
Knitting stripes but hate sewing in ends? Carry the yarn up the side of your work when it’s not in use, then you can just pick it up again when you need it! Remember to twist the strands together to maintain a neat edge.
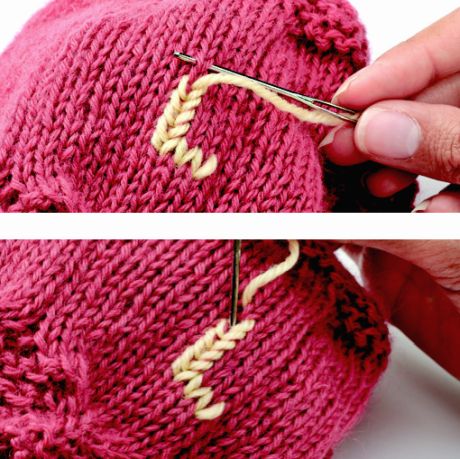
Swiss darning
For simple yet effective colourwork, Swiss darn your motifs over your knitted fabric. This is where you embroider imitation knitting stitches over the top of your work. It’s quick to do and saves lots of complicated colour changes. To do it, thread a tapestry needle with yarn and insert it through the fabric from back to front, bringing it out at the bottom of the ‘v’ of the required stitch. Following the diagonal line of the stitch, insert the needle underneath the two loops at the base of the stitch above. Still following the diagonal line of the stitch, take your needle back through the entry point. This should leave an embroidered ‘v’ shape which has the look of a knitted stitch.
Hazel Tindall’s Speed Knitting Secrets
Hazel Tindall, one of the world’s fastest knitters (knitting 262 stitches in three minutes in 2008), shares her tops tips on speeding up your knitting:
• I like to use double pointed needles and a knitting belt, which is worn at the right side about waist level, or lower. The right needle is pushed into one of the holes in the belt pad; this keeps the needle anchored as the stitches are worked.
• When knitting, I hold the needles with my hands on top, although I often see people hold the right needle like a pencil. This might be okay for a few stitches but I can never figure out what they do with lots of stitches on the needle.
• My only finger that doesn’t touch the needles at all times is my right index finger, with the movements made by this finger being quite small. My right thumb pulls the stitch as it’s made and my left thumb pushes the next stitch towards the point of the left needle. My remaining fingers help with this pulling and pushing technique.
• When knitting with two colours I hold the background colour with my right index finger and the contrasting colour with my left index finger.
For more from Hazel, go to hazeltindall.com for her blog and patterns. Plus, make sure you take a look at her videos showing her knitting technique too!


_333_180_c1.png)
 Baby
Baby
 Toys
Toys
 Garments
 Crochet
 Homewares
 Dolls
Dolls
Share