


Make a Simple Christmas Bauble
video by
Let's Knit Together
- Overview
- Practical Guides
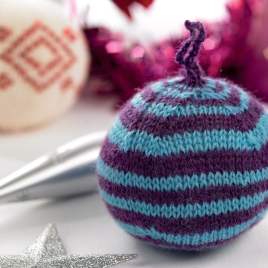
If you can knit in stocking stitch, you can make a bauble! Being able to knit a simple ball shape is a great way to practise simple increasing and decreasing stitches, and here we show how it is done with a flat piece of knitting that is simply worked in rows, then sewn up.
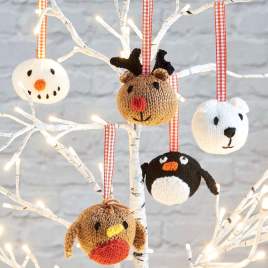
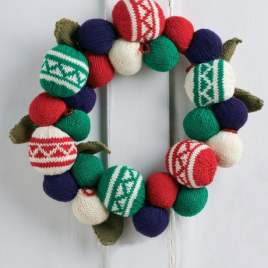
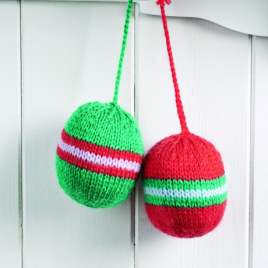
It’s an ideal project for beginners and a relaxing project for more experienced knitters, and you’ll also find this handy for shaping heads and bodies on various toys. The increase is made by knitting into the front and back of the same stitch (kfb) and the decrease is just knitting two stitches together as one (k2tog). Just think how you can customise this with colour changes, Swiss darning, embroidery and extra features and accessories! Why not make a whole set for your tree, or to give as a special gift. At the end of the knitting pattern, cut the yarn leaving a long tail of around 30cm for sewing up. Thread the tail into a tapestry needle, then run back through the remaining stitches that are still on the knitting needle, then lift off. Gather the cast-on stitches by pulling on the yarn tail to close the top, then add a securing stitch. Sew up the row ends using the yarn tail and mattress stitch, leaving a 5cm gap for stuffing. Tease out the toy filling to an even texture and get rid of any lumps, then insert it evenly into the ball to give it a firm shape. Finish closing the seam and fasten off securely. The cast-on edge may appear a little gappy, so you can always run the needle with the remaining tail ends discreetly around the top for a gathering stitch, and pull this tight to match the cast-off end. Tie a knot to secure and trim the ends to a good hanging length. To add a contrast ribbon or crochet hanging loop instead, take the needle down inside the bauble to lose the end within the filling. If you decide to embellish the bauble, remember that the piece will stretch after stuffing, and any embellishments sewn on too tightly may distort the sphere shape, so it’s best to leave this until last. Here are a few ideas for embellishing your bauble! - Embroider with simple stars in yarn, or finer designs with embroidery thread sew on sparkling sequins, beads or ribbon - Swiss darn a coloured motif, such as a Scandi star or coloured patches - Add icord arms, legs and embroider facial features for special characters - Knit extra patches or pieces for ears, beaks, wings, antlers or noses for cute animals - Change colours to create stripes - Create intarsia coloured areas to embroider faces - Use a sparkly or fluffy yarn It’s up to you! —- Here is the basic bauble pattern to practise with: BASIC BAUBLE PATTERN Using 4mm needles and dk yarn, and leaving a long tail of about 15cm cast on ten sts Row 1 (RS): (kfb) to end. 20 sts Row 2: p Row 3: (k1, kfb) to end. 30 sts Row 4: p Row 5: (k2, kfb) to end. 40 sts Rows 6-16: beg with a p row, work in st st Row 17: (k2, k2tog) to end. 30 sts Row 18: p Row 19: (k1, k2tog) to end. 20 sts Row 20: p Row 21: (k2tog) to end. Ten sts See above for making up


_1_268_268_64_c1.jpg)


 Kntting Video")


 Kntting Video")
