


How to: add fringing
video by
Let's Knit Together
- Overview
- Practical Guides
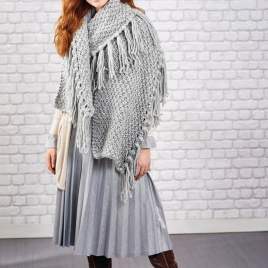
A fringe is an evenly spaced dangly edging that really adds some swish to an accessory, but the same simple technique can be used for adding hair to a toy’s head, or fur, a long tail or even a mane to an animal. Your pattern will tell you to cut the right number of lengths of yarn for your project, so measure and cut the right number before you start.
Have fun with your fringing! Mix and match colours, and you can even add knots or thread on beads to the tails, and this is another area that you can use to create a pattern.
For a lot of fringing, you might want to find something slim to wrap the yarn around. Remember, something half the size will give you about the right length. For each strand you need to make one complete wrap. Slide the wraps off, smooth out the loops and cut through one end only. A crochet hook is a handy tool for this, but you can also use your fingers or a tapestry needle to pick up the loop. The principle is to fold a strand in half, insert the folded loop through to the other side by a couple of centimetres, then pull the two tails through the loop and tighten the loop to the surface or edge of the fabric. You can insert your crochet hook through to the other side to grab the loop and pull it through or on looser fabric, just use your fingers, or insert a tapestry needle into the loop to pull it out as much as you need. To get a bar at the base of your fringe on the right side of your fabric, insert the folded loop from the right side to the wrong side, then pull the tails through. To get the A-shape on the right side, insert the folded loop from the wrong side to the right side, then pull the tails through. Your pattern will guide you as to the soaring of the individual fringing, it might be through every stitch, or space ten tassels evenly along the length, so plan your spacing. Also, you will need to insert the loop consistently through the same point in or between stitches along the row or edge for a consistent look. It’s a quick fix to whip out a fringe and reposition it if the lines look uneven when you’re done. For a special colour effect, it may be better to work from the centre out to keep symmetrical. One strand of folded yarn will result in two tails, two strands in the same gap will produce four tails and create a fuller fringe. When all the fringe strands have been inserted and tightened up to look even, smooth out the strands to make them lie flat, ready for trimming to the final shape with scissors. This may be to simply follow the edge of your knitted piece, or to add interest on a wall hanging with a V or zig zag edge. You can use a guide, like a long ruler or your crochet hook if it helps, but take care it doesn’t move.


 Kntting Video")


 Kntting Video")
