What you need to know
KNIT STEFFI HOCHFELLNER'S ADORABLE TOY AND HER STYLISH OUTFITS!
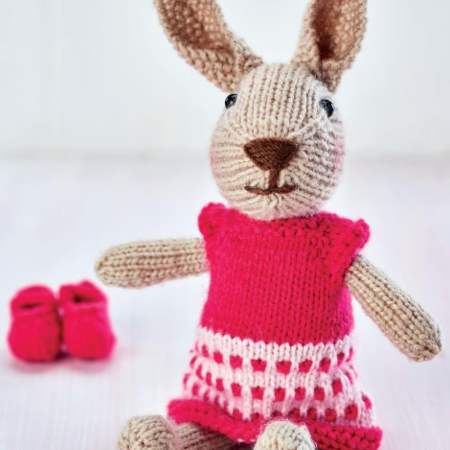
No rabbit should be without a complete wardrobe and Betty Bunny has an ensemble for every occasion. You can knit Betty, along with her pretty pink dress, green dungarees, pretty purple dress, and bright yellow cardigan with this pattern. This pattern may involve a few new techniques, like i-cord and working an uneven stripe pattern. Read through the instructions before you begin so there are no surprises later on!
What do I need?
BETTY BUNNY
Yarn: DK, shades:
(A) Brown, 50g
(B) Bright Pink, 15g
(C) Light Rose, 10g
Oddments: DK, 4ply Bright Pink (for shoes and bow), Dark Brown
Needles: 3mm
Crochet hook: 3mm
Stitch markers: two
Safety toy stuffing
Beads: two
Button
Tapestry needle
OUTFIT ONE
Yarn: DK, shades:
(A) Mint, 25g
(B) Yellow, 30g
(C) Off White, 10g
(D) Petrol, 5g
Needles: 3mm, straight and doublepointed, two
Crochet hook: 3mm
Stitch holders
Buttons: three
Tapestry needle
OUTFIT TWO
Yarn: DK, shades:
(A) Purple Ombre, 25g
(B) Purple, 30g
(C) White, 10g
Needles: 3mm
Crochet hook: 3mm
Stitch holders
Ribbon: 40cm
Beads
Tapestry needle
Sizing
Betty the Bunny stands 20cm tall
Top Knit Tips
Our bunny play set comes with some small parts so we wouldn’t recommend it for children under 36 months.
Use matching yarn from your stash to make shoes and a bow to complete Betty’s outfit.
If you can't crochet a loop for the bow, just make a short plait and sew it in place.
Mark the position of the eyes with pins or small stitches. To form the eye sockets, use a tapestry needle and yarn A, and insert the needle at the position of the right eye, pulling it out at position of the left eye. Move one stitch across and insert the needle back through the work, coming out close to the starting point. Pull to gather the fabric until the eye sockets are deep enough and secure with a knot. Weave in the ends then sew the beads into the sockets.
To join the yarn in crochet, you often use the slip stitch method. Make a slip knot and place it on your hook. Insert the hook through the edge where you want to join the yarn. Wrap the yarn around the hook from back to front and pull the yarn through the fabric and your slip knot.
Don't forget to save your PDFs to your computer or tablet device as soon as it has been downloaded.
Watch to learn
Brush up on the skills needed for this pattern with this tutorial.
Techniques: Basic Shaping, Slip Stitch, Stocking Stitch
