

How to: work slip stitch beading
video by
Let's Knit Together
- Overview
- Practical Guides
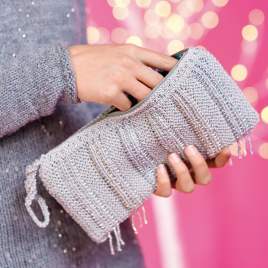
Beads can be added to knitting in various ways and really add a special touch. With this method the bead is bound into the fabric in front of a slip stitch and sits horizontally and on top of the fabric, rather than at the base of a stitch. Beads are slid down onto the yarn before they are needed, then brought up to be added in, so plan ahead with this method.
Beads come in a fantastic range of colours, shapes and sizes, and you can always simply sew any bead on, assuming you can secure it to your knitted fabric and it won't adversely affect the drape. However, if they are going to be an integral part if the knitting, with the yarn passing going through the bead centre, make sure that the diameter of the hole can take a strand of yarn without pinching the strand noticeably it – at the same time the bead aperture should not be so big as to allow the bead to be too loose and slide around.
Your pattern will normally be quite specific as to which beads to obtain or you can search for knitting/crochet beads that will have larger and more standard-sized holes, just be aware different manufacturers may have slightly different size guides, so check carefully that a bead type will suit your needs. Heavy beads can weigh down and distort a piece of knitting, so are best used close to lower edges. In the video, we chose size 3 (5.5mm) for working with the Aran yarn.
In a pattern you may find the abbreviation ‘pb’ for ‘place bead’. Alternatively, the bead pattern may be shown in a chart form, with the bead being given a symbol. Charts are usually read from the bottom up, and right to left for knit rows, and left to right for purl rows. Always check the key and follow the chart.
With this slip stitch method, beads cannot be placed on every stitch and on every row, they need to be spaced on alternate rows and stitches. Usually they are added to the knit side of stocking stitch, as they are somewhat lost on the purl side.
If the beading is near the start of the project for example at a hem edge, you will need to add the beads to your yarn strand before you cast on. (If much later on in the project, it is makes more sense to cut the yarn at the end of the row, add the beads to the yarn, then rejoin the strand and carry on.
Count out how many beads you need into a small container from which you can easily pick them up with a sewing needle. A small jewellery box with a flocked surface is ideal for this, especially if all of the beads are the same colour or you’re happy for a random effect. Thread a sewing needle with a short length of thread and knot the ends together to create a loop. Insert the tail end of the yarn through the thread loop, then pick up the beads with the sewing needle and slide down them down the thread and onto the yarn.
TIP To add a variety of different coloured beads in a certain order bear in mind that the beads you need to use first must be added to the yarn last. If you’re adding beads from a chart, start at the top left and work backwards along the rows, so the last bead you add to the yarn, will be the first one you knit.
Work up to the stitch in the pattern where you to to place a bead. On a knit row, slide the bead up the yarn to the needles. Bring the yarn with the bead forward between the needles and to the front of the work. Slip the next stitch on the needles purlwise left to right, so the bead sits in front of this slipped stitch. Next take the yarn back between the needles, ready for the next knit stitch. Knit the next stitch tightly as this will help to keep the bead at the front. Carry on with the pattern to the point where the next bead must be added and repeat.
If you need to place a bead on the knit side but on a purl row, take the yarn between the needles to the back, slide a bead up, slip the stitch purlwise, then bring the yarn to the front and purl the next stitch tightly to hold the bead in place.
If you think you’ll need to regularly wash your beaded item, do a little sample in the project yarn and wash it according to the yarn ball information. Be aware that plastic beads may fade, coated beads may peel, and wooden beads may only be suitable for hand washing, if at all.