


Nobody’s perfect, and whether you’ve been knitting for five weeks or 50 years you’re not immune to making mistakes. Luckily, LK is here to help address some common errors and show you how to fix them.
Notes for Newbies
Everyone has been through the learning stage and most people will have encountered similar problems. Here are a few things to watch out for.
Too many stitches
Do you sometimes find that you have suddenly acquired a lot more stitches than you began with? One reason for this is putting the needle through the strand and splitting the yarn when you are making a stitch. This may look like there is an extra loop for you to go into so you end up working too many stitches on a row. Make sure the needle goes through the whole of the stitch.

Extra loops
Some people find that they accidentally wrap the yarn around the needle between stitches, making extra loops as they go. The yarn should be at the back of the work for knit stitches and at the front to purl. If you need to move the yarn, make sure you take it between the needles and not over them.
Stitch Perfect
When there’s a problem with an individual stitch, it can affect your entire project. Here’s how to correct some common errors. The same method can also be used for correcting knit stitches that should have been purled, and vice versa.
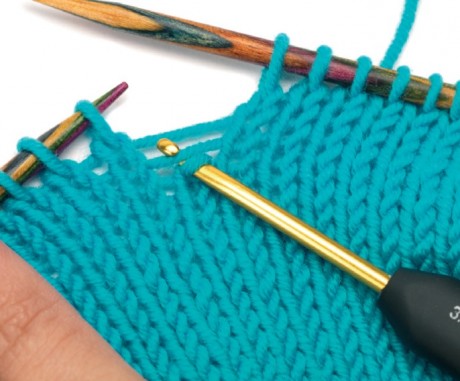
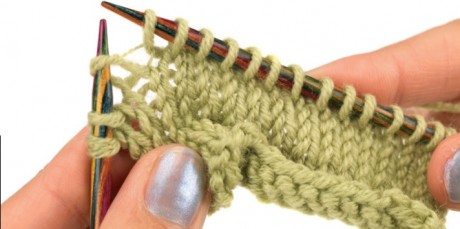
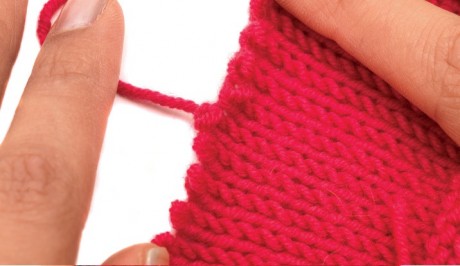
Dropped stitches
A dropped stitch not only makes a hole but can cause that column of stitches to unravel back to your cast-on edge, giving you a ladder. To fix it, insert a crochet hook into the front of the dropped stitch. Catch the strand that is running behind the stitch and pull through the loop on the hook. Repeat this until you have the correct number of rows. On alternative garter stitch rows, insert the hook from the WS and pull the strand through the back of the stitch.
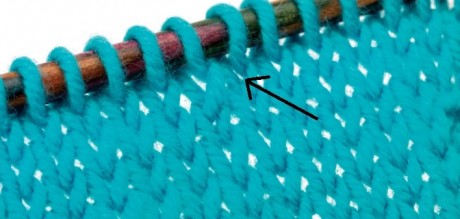
Twisted stitches
On knit stitches, note how the strands at the bottom of each v-shape lie flat. When they are twisted, this causes a little bump. To fix it, use the same method as for picking up dropped stitches and reposition the stitch so the twist is removed.
Controlled Unravelling
If you do get in a real mess and need to undo sections of your work, don’t just start pulling away at your yarn. Here’s how to unravel carefully and accurately.
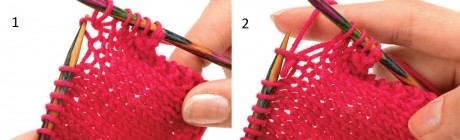
Tinking
This unusual term is ‘knit’ spelt backwards and that’s exactly what you do. If you just need to undo a few stitches it is easier to tink them one at a time than running the risk of whipping out the needle and losing all your stitches.
Step 1: insert the LH needle into the back of the st below the st on RH needle
Step 2: slip st off RH needle, keeping the st below on the LH needle and unravel the yarn
Frogging
If you have to unravel several rows, tinking may take a little longer. Instead, remove the needle from the stitches, then slowly and carefully unravel the work to the end of the row. Turn the work, then do the same to the end of the next row. Remember to keep turning your work at the end of the row in order to keep track of where you are and which side of the work is the right side. If working in the round, pause each time you reach the round marker.
Prevention is better than cure
As we all know, knitting is much easier when it all goes to plan. Here are some tips to help you stay in control.
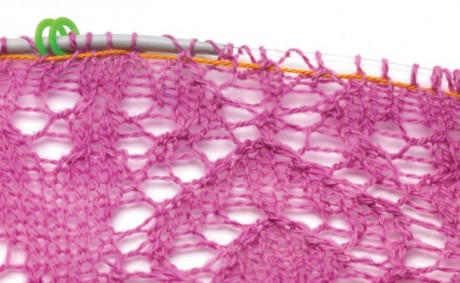
Lifelines
It is easy to misread complex patterns, especially lace designs. After you’ve completed one full pattern repeat and you know it’s correct, insert a length of contrasting yarn through all the stitches with a darning needle, then resume knitting. If you make a mistake you can take all the stitches off the needle and frog back to the lifeline which is holding your stitches. At the end of the next pattern repeat, just move the lifeline.
Keep count
Count your stitches after every row, then count them again to double check – if you have lots of stitches, place markers after every ten stitches to help you keep count.
On point
Make sure your stitches are at the back end of your needle when not in use so they don’t come off the end in your bag. Alternatively, use point protectors.
More handy hints…
Holey increases
When using the Make 1 increase, knit into the back of the loop on the needle, unless otherwise directed, to avoid getting a hole.
Read, read and read again
One of the most common reasons why people make mistakes in their knitting is that they have simply misread the instructions. This can include skipping a line, working the same row twice, omitting increases or decreases. Make sure you read the instruction several times, and also look a few rows ahead so you can understand how the pattern fits together.
Remember, at Let’s Knit, we’re always on hand to help answer your questions! Email support@letsknit.co.uk for help with any of our patterns, or get in touch via Twitter or Facebook.
_333_180_c1.png)


 Baby
Baby
 Toys
Toys
 Garments
 Crochet
 Homewares
 Dolls
Dolls

Share